
Living in California, I constantly see beauty trends shifting and evolving. However, despite the endless stream of viral makeup hacks, one thing remains timeless: the pursuit of a flawless, natural-looking base that enhances your unique features rather than masking them. I used to stare at the mirror, wondering why my eyeshadow looked muddy or why my foundation felt heavy, even though I was following popular tutorials step-by-step. The truth? Many conventional makeup techniques are designed for specific facial structures—like deep-set eyes or highly angular cheekbones—and simply do not flatter softer features or hooded eyes.
Today, we are going deep into the art of K-Beauty makeup application. We will compare the outdated, heavy-handed techniques with the modern, strategic approaches that make your skin look like skin, your eyes look brighter, and your features look effortlessly balanced. Let’s break down exactly how to upgrade your makeup routine.
1. The Canvas: Strategic Skin Prep and Base Makeup
The most common mistake people make with their base routine is over-applying product. In the world of K-Beauty, the philosophy is always “less is more.” A flawless base starts long before the foundation touches your skin.
Minimalist Skin Prep for Oily Skin
If you have oily or combination skin, layering heavy serums, thick moisturizers, and heavy primers will only cause your makeup to slide off by noon. Instead, keep your skin prep highly targeted. A lightweight moisturizer followed by a hydrating sunscreen—such as the Isntree Hyaluronic Acid Watery Sun Gel—is often all you need. Skipping skin prep entirely is a recipe for disaster, as dehydrated skin will overproduce oil to compensate, leading to a greasy finish.
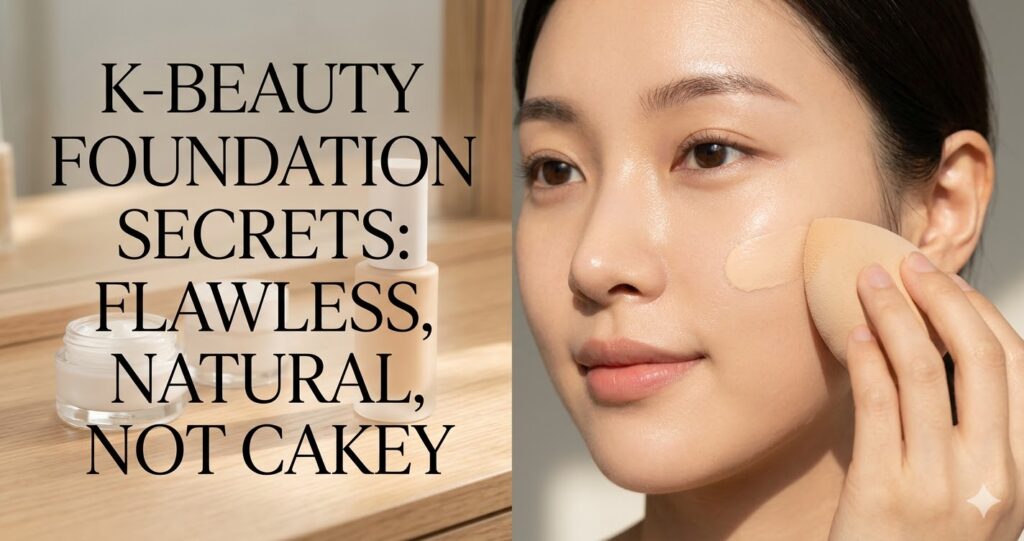
The Foundation Trap: Why Full Coverage Needs a Light Hand
When dealing with acne scarring or hyperpigmentation, the immediate instinct is to pump out a generous amount of full-coverage foundation. While products like the Estée Lauder Double Wear Foundation are incredible for their longevity and oil-control, applying too much will instantly age you and create a “mask-like” effect.
Expert Tip: Apply only a fraction of a pump. Use a damp makeup sponge (like the Real Techniques Beauty Blender) to press the product into the skin. The sponge will absorb the excess foundation, leaving behind a thin, natural veil of coverage. Remember, foundation is meant to even out your overall skin tone, not to cover every single blemish. That is what concealer is for.
The Concealer “Marination” Technique
Instead of investing in overly expensive concealers, reliable drugstore options like the Maybelline Fit Me or Age Rewind concealers perform beautifully when used with the right technique.
The secret to maximizing coverage without caking is the “marination” method. Apply a small dot of concealer directly onto your blemishes or acne scars. Do not blend it immediately. Let the concealer sit on the skin for about one to two minutes. This allows the solvents in the formula to evaporate slightly, thickening the pigment. When you finally tap the edges with your finger or a sponge, the coverage will remain locked directly over the blemish rather than shearing out into nothing.
Case Study: The Power of Marinating A recent beauty trial showed that allowing liquid concealer to semi-dry before blending increased its opacity by up to 40%, allowing users to achieve maximum coverage using significantly less product. This drastically reduces the chances of creasing and texture buildup throughout the day.
2. Framing the Face: Soft Brows and Hooded Eyes
The way you frame your face can completely alter your overall vibe. Heavy, dark lines can make you look stern and unapproachable, while softer edges promote a youthful, vibrant appearance.
Soft Brows for a Youthful Look
Using a black brow pencil on dark hair is a common pitfall. It creates “Sharpie brows” that look heavy and intense. To achieve that signature soft K-Beauty look, select a brow pencil that is one to two shades lighter than your natural hair color (such as an Ash Brown).
Focus the most product on the tail and the middle of the brow, using an incredibly light hand as you move toward the front. To finish, use a tinted brow mascara, like the NYX Thick It Stick It, to add texture and hold the hairs upward. This creates a fluffy, natural dimension that softens the entire face.
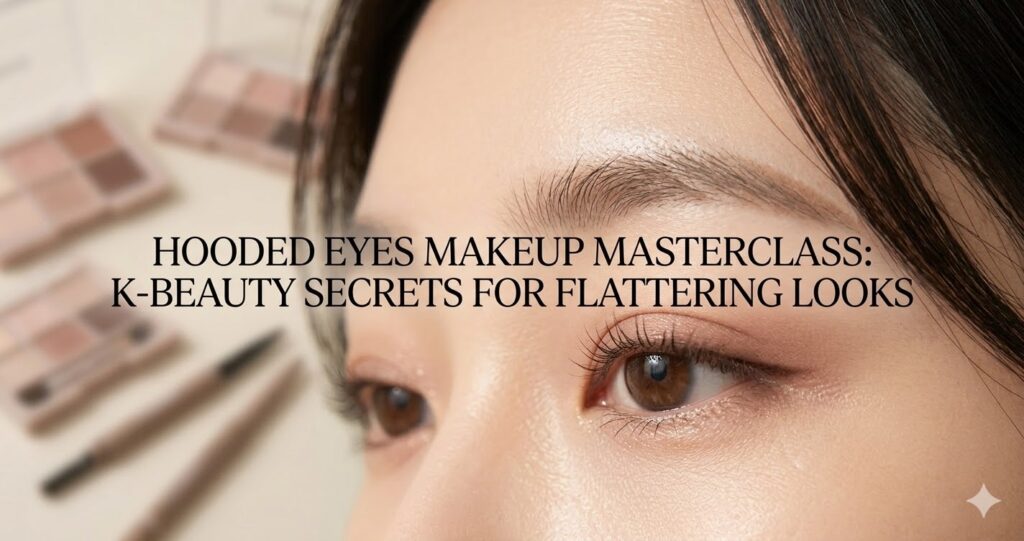
The Truth About Eyeshadow on Hooded Eyes
If you grew up watching Western beauty influencers, you were likely taught to sweep a light brown shade directly into your eye crease, followed by a dark shade in the outer corner. While stunning on deep-set eyes, this technique is highly unflattering on hooded or monolid eye shapes.
The K-Beauty Method for Hooded Eyes:
- Ditch the Crease: Take your light transition shade and apply it all over the lid, bringing it slightly downward toward the lash line rather than swooping it high up toward the brow bone.
- Lower Lash Line Focus: Dust that same light brown shade under your eyes. This connects the top and bottom, making the eyes appear naturally larger.
- Strategic Depth: Use a smaller packing brush for your darker brown shade. Keep it strictly on the actual eyelid space below where the hood folds. Add a tiny amount just at the very outer edge of the eye to elongate the shape softly.
Illuminating the Eyes and Curling Lashes
Applying a thick, frosty shimmer all over the eyelid can actually make hooded eyes look smaller and puffier. Instead, take a shimmer stick (like the CoverGirl Clean Eye Color) and focus it purely on the inner corners and the “aegyo sal” (the small pocket of fat directly beneath the eye that puffs up when you smile). This brings instant youth and brightness to your expression.
When it comes to eyeliner, an aggressive, thick, upward cat-eye can easily overwhelm softer features. Try a very thin, slightly downturned “puppy liner” to complement an upturned eye shape. Finally, when curling your lashes, never just clamp once at the base. Gently pulse and clamp as you move the curler up the lash shaft to create a beautiful, lifted “C” shape rather than a harsh, crimped “L” shape.
3. Sculpting and Coloring: Blush, Contour, and Highlight
Where you place your color products dictates where the viewer’s eye is drawn. The goal of K-Beauty makeup is to draw attention to the center of the face, keeping the features looking compact and harmonious.
Inward Blush Placement
Applying blush high up on the cheekbones and blending it toward the temples draws attention to the width of the face. If you want a softer, more centered look, try placing a liquid blush (like the Rare Beauty Soft Pinch Blush in the shade Encourage) closer to the apples of your cheeks, blending it slightly inward toward your under-eye area. This shortens the mid-face and brings a beautiful, flush focus directly to your main features.
Contouring the Outer Perimeter
Standard contouring tutorials often teach drawing a harsh “3” shape on the sides of the face. However, if you want a softer, “snatched” look, focus your contour stick entirely along the outer perimeter of the jawline and the far edges of the face. By shading these outer areas, you are visually erasing the width of the face, pushing all the light and focus straight to the center.
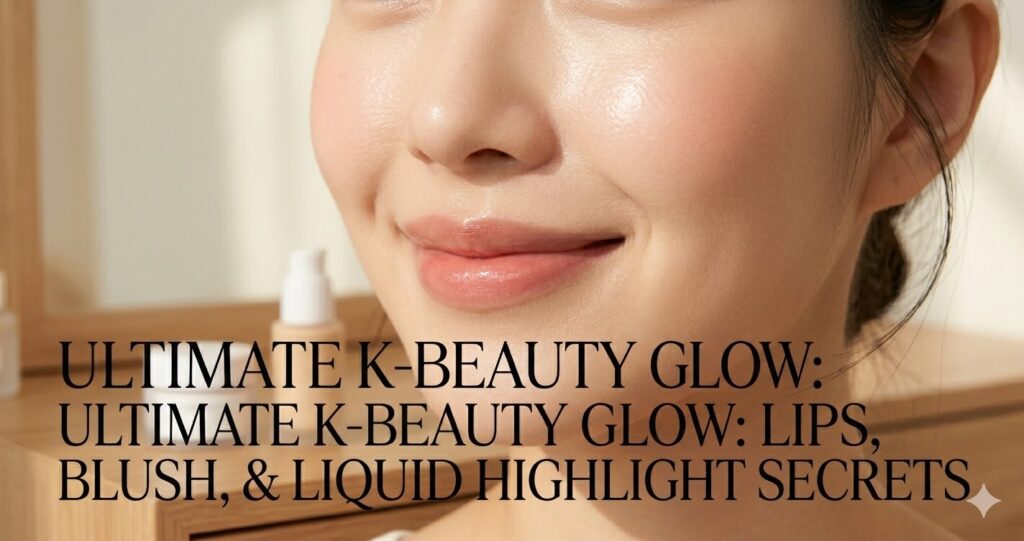
The Liquid Highlight Illusion
Powder highlighters that consist of chunky glitter sit heavily on top of the skin, highlighting texture and looking artificial. For a true “glass skin” effect, opt for a luminous liquid product like the Charlotte Tilbury Flawless Filter. Tapping a tiny amount of this onto the bridge of the nose and the high points of the cheeks mimics the look of natural, hydrated skin glowing from within.
4. The Finishing Touches: Lips and Locking it In
The lips are the final anchor of your makeup look. Heavy, matte, opaque lipsticks can look incredibly beautiful, but they often add years to the face and require high maintenance throughout the day.
Subtle Overlining and K-Beauty Lip Tints
Overlining is an art form. While the camera might forgive heavy overlining, in person, the 3D texture of your natural lip line will give it away.
The Perfect Lip Routine Checklist:
- Line Lightly: Use a natural, beige-toned lip liner (like NYX Sand Beige) just a fraction of a millimeter outside your bottom lip and the cupid’s bow. Leave the sides of the top lip natural. Draw slightly upward at the corners of the mouth to create a subtle, lifted smile.
- Tint, Don’t Swipe: Instead of swiping a thick lipstick, opt for a water-light lip tint, such as the Romand Juicy Lasting Tint (Pink Pumpkin is universally flattering). Dab a small amount in the center of the lips and buff it outward with your finger for a soft, blurred gradient.
- Gloss: Finish with a clear, hydrating gloss (like Tower 28) layered purely in the center for maximum volume.
Locking it in
Once your masterpiece is complete, skip the heavy layers of baking powder. Instead, lightly press a finely milled translucent powder just in your T-zone and under your eyes to control oil. Finish with a mattifying setting spray to lock the moisture in and keep the oils at bay, ensuring your flawless base lasts from morning until night.
Mastering these subtle shifts in technique will completely transform the way your makeup looks both on camera and in real life. By working with your natural features instead of against them, you can achieve that coveted, effortless K-Beauty glow.
💡 자주 묻는 질문 (FAQ)
Q1: How do I prevent my foundation from looking cakey on oily skin?
A1: To prevent caking, minimize your skin prep to just a lightweight moisturizer and sunscreen. Use a very small amount of a long-wear, oil-controlling foundation, and press it into the skin with a damp beauty sponge to absorb excess product. Spot-conceal blemishes only where necessary.
Q2: What is the best way to apply eyeshadow for hooded eyes?
A2: Avoid the traditional deep-crease contouring. Instead, apply your transition shade all over the main lid and under the lower lash line. Keep your darker contour shades strictly on the lid space below the hood, and focus your shimmer only on the inner corners and the lower lash line to brighten the eyes.
Q3: Why should I use a lip tint instead of a traditional matte lipstick?
A3: K-Beauty lip tints offer a much more natural, lightweight finish that stains the lips for all-day wear without feathering. They are perfect for creating a soft, blurred gradient effect that looks more youthful and hydrating than a heavy, opaque matte lipstick.
🌿 Weekly wellness, health & beauty insights — straight to your inbox
Free subscription · Cancel anytime


